Free shipping on orders over $100! **After discounts have been applied & Continental US only

diy paint

Hammered Metal Drawers – Hometalk Live Demo!

My great find – the Hutch base!

So here is the picture of the Hutch that I’m working on – this is the before picture.  The drawers were never painted, but someone has a love with “Pledge” and I felt it was best to sand it all off – paint and all!!!

Here are my drawers all nice and sanded – ready for a fabulous Hammered Metal Finish!!!

So let’s get started with my favorite primer XIM Bonding Primer – one layer should do the job and then allow to dry.

Next, I taped off the center raised panel and was ready for the next step.  I applied a thin layer of my ArtsSyVille Embellishments Texture Medium – you only need it to be about 1/8″ to 1/16″ thick – just enough to get the print of the roller.  I used a trowel to apply the medium, but you can use a hotel room key, styrene applicator, putty knife, or anything that you can get the product onto the surface.

While the Texture Medium is wet – you need to roll through it with the Fauxy Roller Ostrich Pattern.  I rolled through twice to get a pitted/hammered metal look – allow the texture to dry (this can take several hours – but make sure it is completely dry).

Once the texture has dried – you will want to sand down the high peaks – I used 150 grit sandpaper. Remove the tape and clean up the edges if necessary.  Wipe down to remove all the dust and make sure the surface is clean.

The next step is to paint the surface with Modern Masters Antique Copper Metallic Paint – I applied two layers allowing each layer to dry in between.  Metallics can be a little soft – so it’s best to allow the paint to dry overnight before applying the glaze layer.

Next we are going to create a glaze – I used Modern Masters Wall Glaze and Modern Masters Glazing Colors Van Dyke Brown.  My favorite recipe is 1 cup of glaze to 3 tbls of Van Dyke Brown – this creates a nice balanced glaze.

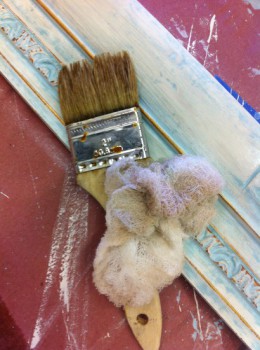
Apply the glaze over the painted surface – 100% coverage and then use Cheesecloth to remove the excess glaze leaving behind enough to get into the details of the wood and texture.  You can remove as much of the glaze as you would like or leave as much behind – it’s a personal thing.

Allow the glaze to dry overnight (at least) glaze can take a good 24 hours to dry completely.  Then make sure to apply at least several layers of Top Coat to protect the finish.

Supplies used for this project:

XIM Bonding Primer (Buy Here)

ArtsSyVille Embellishments – Texture Medium

Fauxy Rollers – Ostrich Skin Roller

Sandpaper 150 to 220 grit

Modern Masters Metallic Paint – Antique Copper

Modern Masters Wall Glaze

Modern Masters Glazing Colors – Van Dyke Brown

Cheesecloth

Application tool – Trowel, room key, putty knife, etc.

Top coat of your choice


Hope that you enjoyed this project!

Blessings,

DIY Foil Pumpkins for Fall Decor

Want to add some bling to your fall decor? How about covering pumpkins in foil? You can use craft pumpkins or real pumpkins, real pumpkins will last approximately two months if you don’t cut them open. I also suggest you paint real pumpkins first, I recommend Debi’s Design Diary DIY Paints.

In this tutorial I’m using craft pumpkins and I did not paint them first.

SUPPLIES
Pumpkins (real or craft pumpkins)
ArtsSyVille Foil Adhesive
APS Foil
Brushes
APS Glitter
ArtsSyVille Glass Bead Gel

Start with ArtsSyVille Foil Adhesive and coat your pumpkin while holding the stem. I prefer using an Art Wash Brush for this step. You want an even coat, not too thick, but not too thin. The foil adhesive will go on with a milky white color, but it will dry completely clear. I set my pumpkin on top of an open bucket to allow it to dry so the least amount of surface was touching the bucket. You want it to dry to a firm tack, this could take anywhere from 30 minutes to a couple hours, depending on the humidity where you live. You can even allow it to dry overnight, there’s no risk of waiting too long. Foil Adhesive is water soluble, very easy clean up.
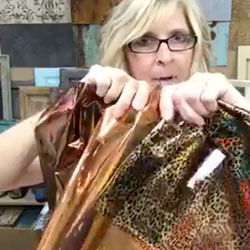
Artistic Painting Studio FoilsOnce your adhesive has dried long enough, cut a few pieces of foil about 12-15” wide. I used two different colors on one of my pumpkins, copper and bronze. Set your pumpkin on a clean surface far enough away from your foils so they don’t stick before you are ready to use them!

Instead of laying the foil on the surface of the pumpkin, I bunched up the foil, being sure that all the film is on the inside so no film will adhere to the pumpkin, and pounced it on the surface of the pumpkin. This gives the pumpkin a nice textured appearance. As you’re doing this and the foil is being pulled off the film, open the bunched up foil and find a new section to use. You might need to use a couple pieces of foil. Once you’ve pounced the foil around the whole pumpkin, switch to the next color. This method is not going to give complete coverage, but it will give a great dappled texture.

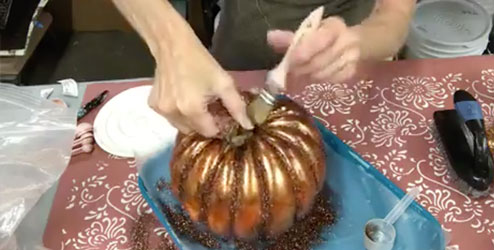
To accomplish more complete coverage, lay the foil over the pumpkin and use a stiff brush to release the foil. Pumpkins with deep ridges will have the foil adhered mostly to the high areas unless you really work it into the crevices. If you have trouble getting tight areas, like under the stem, try balling up a paper towel and using that to rub the foil.

If an area is still really sticky, that means there’s still a lot of adhesive in that area, so go back over it again with some new foil.

Now it’s time to glitter! I covered my tray with Press n Seal wrap so clean up will be easy later and I can save any of the glitter that doesn’t stick to the pumpkin. I used a glitter color called Rich Chocolate, I loved how the dark glitter looks really rich with the copper and bronze foil. With the pumpkin on the tray, I just scooped glitter on the top of the pumpkin and into the low areas. Once I had a good amount of glitter on, I shook it and tapped it a bit and even used a soft brush to thin it out the glitter and move it into the crevices. The glitter will stick everywhere there is uncovered foil adhesive. After letting it sit for a bit, you can gently tap the pumpkin to get more of the unsecured glitter off the pumpkin.

On the second pumpkin I used Seafoam and Rose Gold foils. I cut pieces of the Seafoam foil, approximately 8” lenghts. I needed five of these pieces to cover my medium sized pumpkin.

Before applying the foil, I crunched it first, I feel like this gives a little better transfer, but then I just laid it on the pumpkin and used my scrub brush to get the foil to transfer. Because the pumpkin is not an even surface it’s going to take quite a bit of work to get good coverage. Use a rag or smaller brush to get down into the valleys.

Odd shapes are challenging and you will need to use more foil than you think so that you don’t move the foil to a new area and have an empty area of the film adhere to the surface which can be difficult to remove. Try different transfer methods, a stiff brush, a toothbrush or even your fingers can get the foil to adhere.

If you find that there’s an area that’s not taking the foil at all, if it’s dry to the touch, that area was missed with foil adhesive. You’ll have to go back and touch those spots up with adhesive, let it dry and then reapply the foil.

I didn’t want the seafoam foil to cover completely. Once I worked my way around the whole pumpkin I moved to the second color, Rose Gold. I used this to fill in the empty spots. I had to scrub a bit harder to get this foil to transfer in those spots since the adhesive wasn’t as strong after going over it once.

At the top of this pumpkin I put glass bead gel. ArtsSyVille Glass Bead Gel has tiny glass beads suspended in an acrylic medium. I used a small brush and just painted them on around the stem and out into the crevice areas just at the top of the pumpkin. Don’t let it get too thick, you want just a level row of beads so that it will dry crystal clear. Don’t force dry these, either, allow them time to dry naturally so the gel medium doesn’t haze. It can take a few hours depending on humidity and how thick your application is.
Putting a clear coat over top of your pumpkin is a great idea, especially if you don’t have 100% coverage with foil. The clear coat will make sure there’s no sticky adhesive still on the pumpkin where it could grab on to dirt or other things you don’t want stuck to your pumpkin. Semi-Gloss Final Coat is a great product for this purpose.
I hope you enjoyed this project! If you give it a try yourself, please share your photos on our Facebook page.

Foiled Pumpkins

oct-18-014

So I’m sure that I’m not the only one that has these ideas that just come to me and then it’s finding the time to make them happen!!! I had been so inspired by all the fabulous pictures I have seen over the last month of everyone’s front porch all decorated with painted, glittered, carved pumpkins!  I actually went to Michael’s and Hobby Lobby to find some plastic or paintable pumpkins – but by the time I was shopping (which was last Friday) there wasn’t much to pick from.  So when I was grocery shopping, I picked up a couple more real pumpkins – I love the character of the real pumpkins – not perfect, leaning to one side – dents and all!!!

Well the clock was ticking to get these pumpkins painted – it is already October 18th and I not only wanted them for Thanksgiving, but also wanted them done before Halloween!  So, I get the call late in the afternoon that my Honey is working overtime and the youngest has a meeting a school until 8pm……WOOHOO!!!  Guess what – I get to paint my pumpkins 🙂

Oh, course I just couldn’t paint these all by myself – it would have been fun, but not as much fun as going Live on Facebook……this way I would have some friends to paint with.  Now, I was also hoping that my idea was going to execute well – I really didn’t try this out first!  LOL  So I gathered my supplies and started to prepare one of the pumpkins to speed up the time on Live video and then had you all you join me.

This was a fun project and Thank Goodness – it really turned out awesome – just like I imagined!!!  Whew – dodged that bullet – this could have been awful…..

So here is what I did – step by step – so if you have been dying to paint or Foil some pumpkins here are the instructions and it was pretty fast project (just needed to wait for things to dry and I actually used a blow dryer to speed up the process).

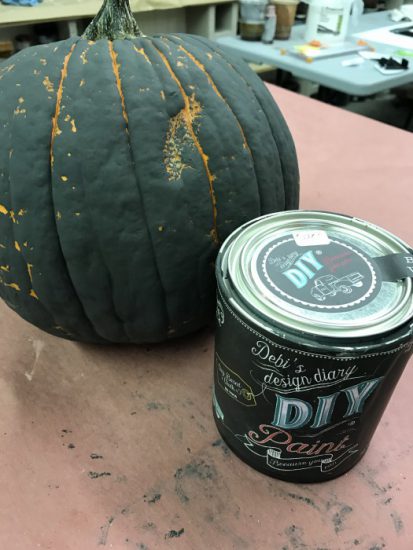
My Vons Pumpkin
My Vons $4.00 Pumpkin

Start with some great “real” pumpkins from the pumpkin patch or Vons, like I did.  I didn’t even wash them – just brushed off any dirt that I saw and started painting.  I used Debi’s Design Diary DIY Paint – Black Velvet.  Turn the pumpkin on the side and paint the bottom first – I blow dried the bottom so that I could stand the pumpkin upright and finish the painting.  I used a 2″ paint brush and didn’t try to paint 100% coverage – allow some of the Orange pumpkin color to still show (it looks great)!

Debi
Debi’s Design Diary – DIY Paints – Black Velvet

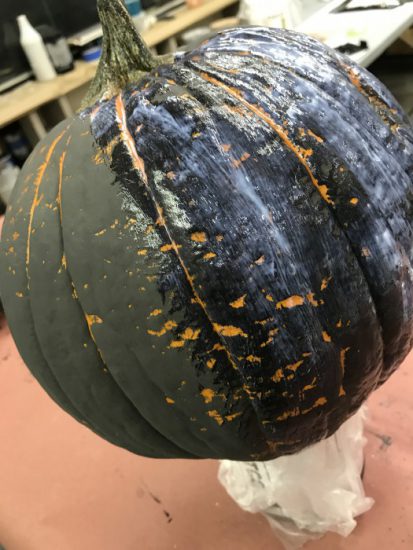
Once all the painting is done and dry – you will apply a layer of my APS Foil Adhesive.  This stuff creates a prefect “tacking finish” for the foils to transfer to.  When you apply the APS Foil Adhesive it looks milky white but will dry completely clear, shiny and tacky.  Allow the APS Foil Adhesive to dry to a firm tack – this can take anywhere form 15 minutes to 1 hour depending on the humidity.

The shiny are is where the Foil Adhesive has been applied.
APS Foil Adhesive being applied.
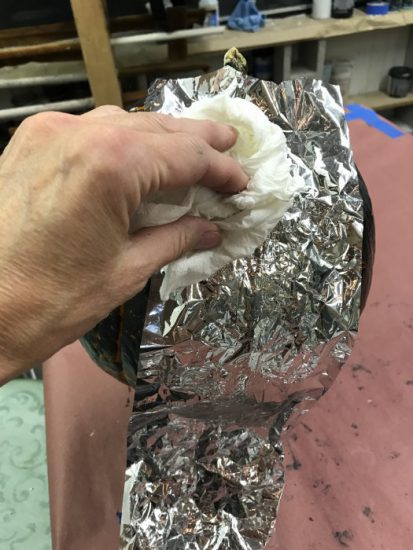
Crinkle up Foil first for this project.

I used my Silver HS Foil – cut your foil into manageable pieces and I crinkled the foil first.  Make sure to adhere the foil to the tacky surface with the “shiny” side up facing you.  Foils are a metalization on the back of clear plastic – with a great foil adhesive and an easy release foil, they transfer to the tacky surface.  Using your hand or a soft rag, rub the shiny side of the foil and transfer as much of the Silver foil as you would like.  I left a lot of the Black showing (that was my personal favorite – but transfer as much as you like).

Rubbing the foil to transfer
Shiny side of foil facing me and rubbing the foil to transfer
Transfer as much of the Silver Foil as you like
Transferring as much of the Silver Foil as you like

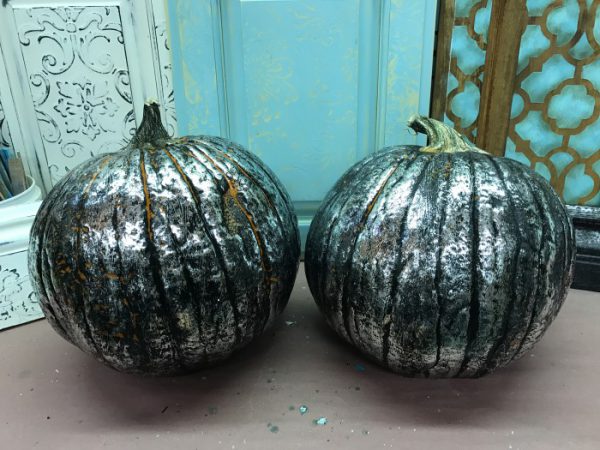
Once the foil is transferred – you can move to the next step if you have one.  I decided I liked the pumpkins just as they are – I have some of the Orange showing, the Black is a matte finish because I used DIY Paints chalky paint and then the shiny Silver foil – I love all the contrast of the different textures.  My pumpkins are still a little sticky because of the Foil Adhesive – but, these will be thrown out after the holidays – so I’m leaving them as is!!!

Finished Pumpkins

Happy Holidays to all of you – hope you have as much fun as I did painting & foiling my pumpkins!!!

You can see the Video on my YouTube Channel – make sure to subscribe so you don’t miss anything!!!  Jennifer’s Foiling Pumpkin Video 

Blessings,

Jenn


A Fabulous Frame – Rollers and American Paint Company

This project was so much fun to create and I always love sharing with my videos – but I thought it would be great to provide you with some written instructions too!!!

My frame was create by a local wood-crafter that makes a lot of projects for me – this was designed to provide me with a wide frame area to create on and will be finished with a chalkboard installed. You can also try your local craft store – I’m sure they will have something fun for you to paint.

Frame painted with Home Plate by American Paint Company

I started out with painting the frame Home Plate – one of the colors by American Paint Company. Once it was dry, I wet sanded it to create a smooth surface – this was accomplished by using Cheesecloth and water. Just rub back and forth – it will remove some of the paint as it smooths out the paint. This is why a little of the raw wood was showing when I was starting to paint on the second color.

Painting on the Shoreline by American Paint Company

I picked Shoreline by American Paint Company for my contrasting color – I did want a strong contrast in color for this technique (and Shoreline is one of my favorite colors)!

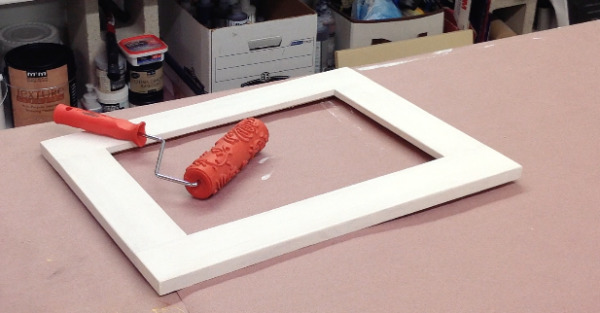
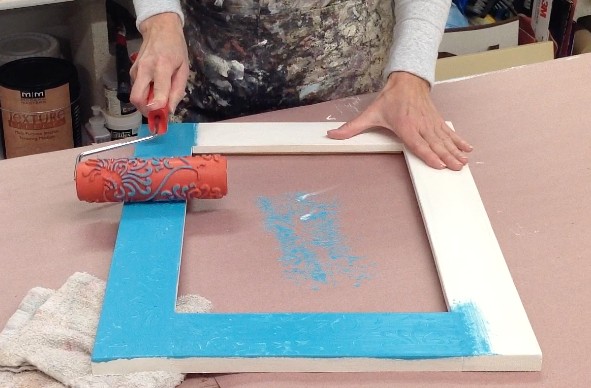
I gathered the my supplies and the Chrysanthemum Roller for my second layer. This is where the fun begins!!! Just paint on the Shoreline, I painted one side at a time to allow the paint to set up a little, but not too much – need to roll through before it dries. Once you have an area painted, just roll through the wet paint and the roller removes the paint creating the pattern. It’s best to “off-load” the roller on some paper so that the roller will continue to lift the paint as you roll. I like to off-load after each section.

Rolling through the wet paint

Once you have painted the areas that you planned to roll through and all the rolling is done – I then finished out the sides and allow the paint to dry.

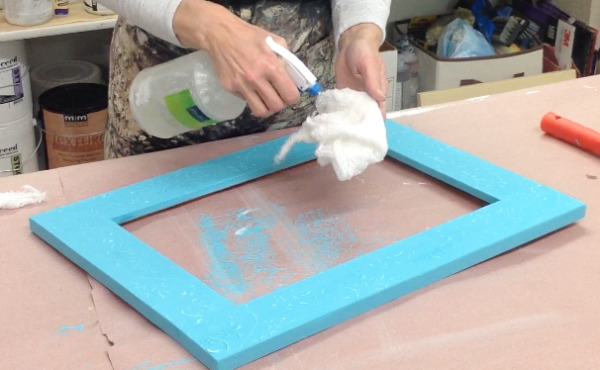
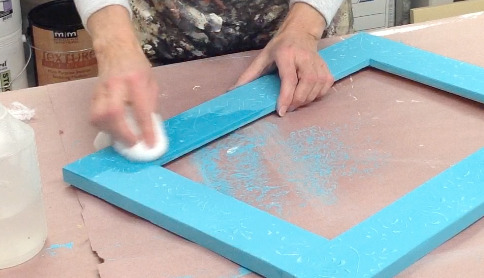
After everything has dried – I began to Distress the painting. I like using a wet-distress technique – Cheesecloth and water! You can spray the water onto your cheesecloth as well as spray water on the painted area that you plan to distress – I like to spray the painted area so that it’s easier to remove and I work less! Distressing is a personal thing to me – I think everyone has the “creative license” to distress as much or as little as desired – it’s a personal taste thing…….so distress as much as you would like! When using the rollers – it will peak up the paint and make a physical texture – I like to wet sand the surface to make it smooth as well as distress the finish. Again, after getting your project wet and distressing the finish – you will need to allow the paint to dry before you can do anything else……..I hate watching paint dry – so I usually have several projects going at once.

Spraying water onto the Cheesecloth

Distressing the finish with water and cheeselcoth

Now we are onto the Wax – I love what the wax does to the paint. It deepens the colors and brings out the richness of the paint. You can use your favorite Wax Brush or Cheesecloth to apply the wax – again, personal preference. Either way, less is best – don’t lay the wax on thick and heavy – it will take forever for it to dry. Thin wins with Waxing – just put on a small amount to the ends of your wax brush or pick up a little with the cheesecloth and rub it over the painted area – I try and spread it out as far as it will go before picking up more wax. (Also – you should always remove the wax from the container and put it onto a disposable surface – that way you don’t contaminate the entire can of wax).

Applying wax with European Wax Brush

Applying Dark Wax with Cheesecloth

I like to apply Clear Wax first – you can let the clear wax dry or you can just put the Dark Wax right over the Clear Wax. The longer you allow the clear wax to dry – the more control you will have with the Dark Wax. I went right over the clear wax with the dark wax – don’t even think I waited a minute – but I was looking for a darker distressed finish.

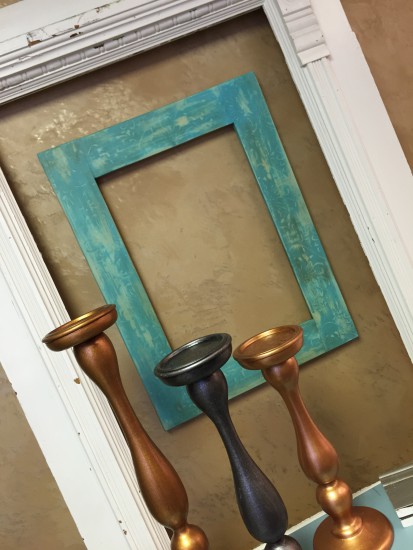
Completed frame and all your supplies

List of supplies and materials for this project:

Check out the video to watch the process and many thanks for watching and reading!!! Rolling with American Paint Company

Blessings,

Jenn


Let’s Chalk it up!!! Creation of a Chalk Board wall….

I have only been in my new studio space for little over a year (4th studio space in 25 years) – so it’s still a work in progress for me!  Time doesn’t always permit for me to complete a painting projects for myself.  But a few months back, I decided that I needed to clean up my office and one thing lead to another…….LOL  While I was cleaning up the floor area behind my desk – I decided that “NOW” was a great time to paint that wall!

office wall
office wall

I had this idea running through my head for awhile and had wanted to create a Chalk Board Wall using the American Paint Company’s Chalk/Clay/Mineral based paints.  So, with the way things get done around here – I went into my studio and found a color spoke to me at that moment –  CORAL REEF🙂  and also Wild Horse’s for the center “framed Chalk Board”.

office2

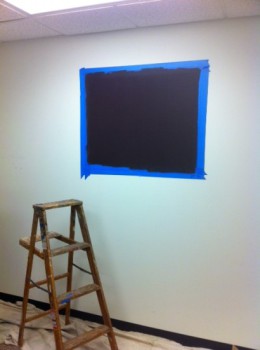
I grab some tape, a pencil and the frame I wanted to use.  Marked off the area for the Chalk Board and painted Wild Horses – I applied three coats, knowing I would season this area and use it as a Chalk Board.  While I was waiting for that to dry, I taped off the rest of the wall so I could paint the Coral Reef color.  I love painting with the APC paints – I had great coverage in one coat with the Coral Reef paint.

wall

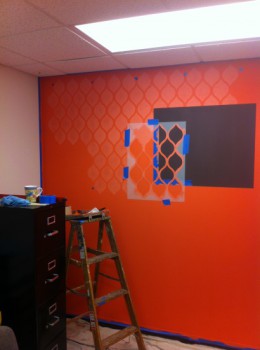
Now – I just couldn’t stop at that point 🙂 I went digging through my stencil designs and decided to pull out one of my newest patterns – Contempo Modern and stencil an all-over-repeat design.  I wanted a tone-on-tone look, so I took the APC Coral Reef and added some Home Plate to lighten it up – maybe around a 75/25 mixture for the stencil color.  The stencil pattern has registration marks to that you can work from right to left and top to bottom – so I just kept stenciling in every direction until I finished out the entire wall.

August 2014 170

wall1

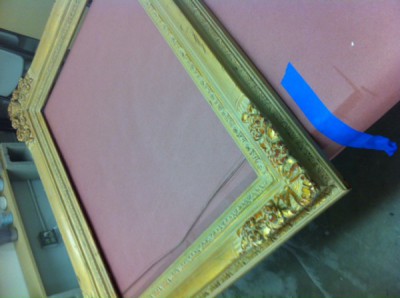
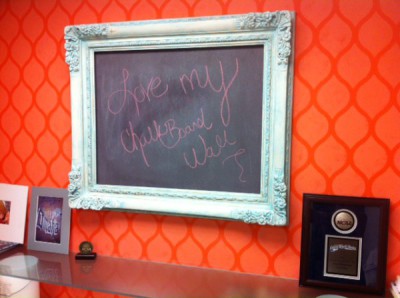
Then came the Frame project – this was a frame that I found at a wonderful little shop I like to stop by once in a while and just see what wonderful little finds she has hidden a away for me!!!  I like creating contrast for interest – so I went looking through my colors and couldn’t help but pick one of my favorite combinations – Surfboad and Home Plate.

frameframe2August 2014 232


I started out by painting on two coats of the Home Plate – allowing each layer to dry in between and then painted on the Surfboard in a “hap-hazard” fashion (very messy looking).  Allowed this to dry and then came in with my “wet-blending technique” and blended the bad paint job of the Surfboard into the Home Plate – using wet cheesecloth.  I will even spray water onto the surface and blend the colors together.   As I was wet blending, I happened to expose some of the original frame color for some highlighting.

August 2014 229August 2014 236

Once everything was dry – I wiped/brushed on a mixture of the Clear and Dark Waxes to create a medium tone wax finish.

Everyone that walks into my office loves the wall – they all say it makes them smile.  I’m not sure if I’m done with this project yet or not – time will tell if I execute the rest of my ideas floating in my head 🙂

chalk wall


Chalk it up Peeps!!!