Free shipping on orders over $100! **After discounts have been applied & Continental US only

Inspiration

Transform Your Cowgirl Boots using Metallic Foils

Transform Your Cowgirl Boots Title Photo


Are you looking to add some personality to your cowgirl boots?  

Do you have an old pair of country boots that are hidden away in the back of your closet?

If you are tired of your boring brown boots, like the pair below, then get ready to see how easy it is to make them look amazing!

Brown Cowgirl Boots

Whether it’s an old pair that you don’t wear anymore or you are looking to stand out, it’s time to transform your country boots into a pair of beautiful boots like these.. 
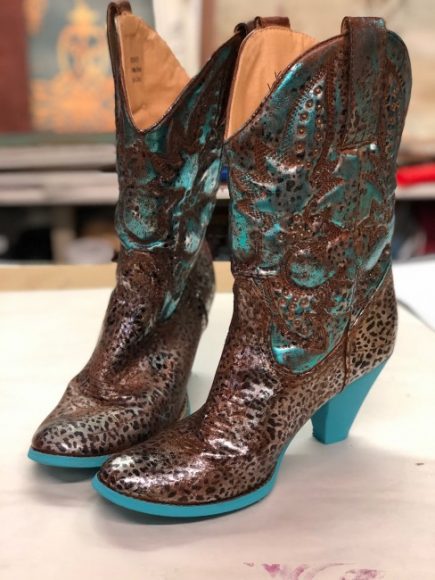
Cowgirl Boots with Metallic Foils

Are you curious how I was able to make my boring cowgirl boots look so fabulous?

You can do it too! It’s really not as hard as you may think.

All it takes is a creative imagination, Metallic Foils, and some Foil Adhesive to create your own cute cowgirl boots.

Before Starting

Before we jump into how exactly we make these gorgeous cowgirl boots happen, you need to have a vision of what you want to create.

Start by exploring all the different Metallic Foil options we have at Artistic Painting Studio here. We have a variety of decorative foils that come in different color variations and patterns to inspire and highlight your unique creativity.

While exploring your creative side, start envisioning what you want your country boots to like when they are all done. You can use your favorite color or combine multiple as I did on this pair!

Metallic Foils:  What Are They?

Now you may be wondering what exactly are Metallic Foils?

They’re like the foil in your kitchen! Just kidding, these decorative foils are very, very different.

Metallic Foils are a metallization on the back of cellophane. This metallization on the cellophane is the color or pattern that will be transferred to your project!

To get the metallization to transfer onto a surface, the surface must be extremely sticky. After getting fed up with the ‘foil glues’ out there, I created my own called, Foil Adhesive. This foil adhesive dries stickier than anything else out there and allows the deco foils to transfer easily.

*Tip – Once the metallization has been pulled off of the cellophane, make sure the cellophane does not touch any areas that are still sticky because it will get stuck!


Cowgirl Boots Makeover – Let’s Get Started!

Prepping The Boots

Are your boots real leather? If yes, then you can skip this first prep step. Yay!

For those of you like me, with fake leather boots, our first step is to seal the surface of our cowboy boots. All you need to do is paint on a layer of Top Coat to the surface. Allow this to dry, roughly about an hour, and then you can get started.

Now we are all on the same step – Applying Foil Adhesive!

With your favorite brush, paint on a layer of the Foil Adhesive where you want the Metallic Foils to transfer. I choose to put foils on my entire boot, so I brushed the adhesive on the entire boot.
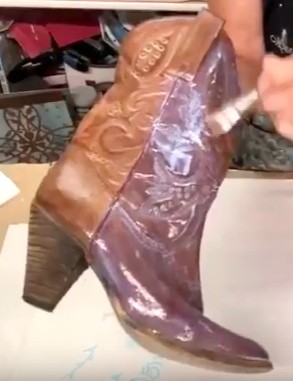
Adding Foil Adhesive to the Boot

But, if you are looking to only add foils to part of your boots, just brush on the Foil Adhesive where you want to apply your foils. You can always come back and foil the other areas later.

After you have applied adhesive, you need to wait a minimum of 30 to 60 minutes to allow it to set-up to a firm tack. It will never dry beyond a firm tack; so don’t worry if you wait even longer before getting to the next step.

Testing Your Vision

As you wait and allow the Foil Adhesive to dry, test out what you have been envisioning prior to adding it to your boots. I always to do this first!
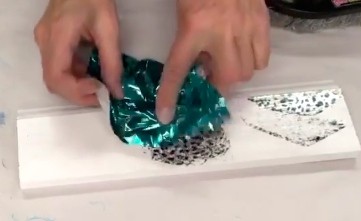
Testing the Foils

I will usually use a scrap piece of wood for testing, but you can really do it on anything you have lying around. Just add a layer of Foil Adhesive to it prior to brushing it on the boots so it has time to tack up.


Different Techniques for Transferring Foils

As with most things, there is more than one way to transfer Metallic Foils. The two techniques I use are Flat Lying and Crinkle.

With both of these techniques, always make sure the color/pattern side is facing up because the metallization is on the back!

With Flat Lying you want to cut off a piece of foil and keep it smooth. Lay it on the surface and transfer the metallization by rubbing the foil with a terry rag or scrub brush. You can pull the foil up a bit and peak to see how well it transferred. If it hasn’t transferred enough foil, simply lay it back down and rub it with a little more force.

You can also take your piece of foil and crinkle it up. Once crinkled, you will want to dab it around the area you want it to transfer to. When using this technique I prefer to use solid color foils rather than pattern because the pattern will be lost without the even pull from the adhesive.

Combining Colors and Designs

If you are looking to create truly unique boots, don’t be afraid to layer on different foils.

Whether it’s adding a color to a design you like or blending two colors, let your creativity take over.

Now play around on your sample board with the different techniques and a few different foils until you create exactly what you want!
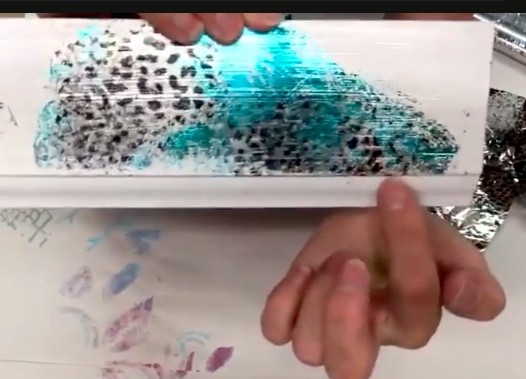
Foil Testing Creation


Transferring Metallic Foils onto the Cowgirl Boots

After testing my designs, I decided I wanted to use Silver Leopard and Seafoam. The bottom section would only have the Leopard foil, while the top would combine the two.

Turquoise Cowgirl Boots

Whether you start on the bottom or top section is up to you! I started off by adding the Seafoam to the top section. Because I knew I was going to come back over with Leopard, my goal was not to create a 100% transfer with the Seafoam.
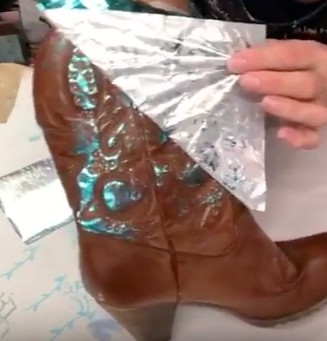
Seafoam Foiling showing transfer

Using the Flat Lying technique and my scrub brushed, I rubbed the foil onto the boot. I started off with a lighter pressure when rubbing because of not wanting the full transfer. After a little rubbing, I lifted a corner to see how much of the turquoise had transferred.

I thought it needed a little more. So I simply laid it back down and added a little pressure to my scrubbing. Remember you can always transfer more, don’t go overboard to start!

Silver Leopard Transfer

Once I had the right amount of Seafoam covering the boot, it was time to add the Silver Leopard foil. With the bottom section still being extremely sticky and not wanting any foil to accidentally get stuck to it, I started there.

With the lower section having some weird angles to it, I went ahead and cut my Metallic Foil into smaller pieces. This does two things, it allows me to get the pieces to lay flat and also allows me to get the most out of each piece!
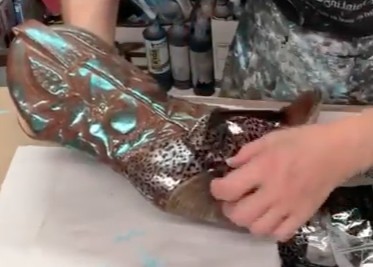
Piece by piece I added the Leopard around the boot going for a full transfer this time. After it was all covered, it was time to move to the top again.

Since the turquoise had been transferred to a lot of the high points on the boot and not really any of the stitching areas, my goal was to get the Leopard to transfer there. With all those nooks and crannies, this turned out to take a little more effort.

Rather than being able to rub the brush on the foil to get it to transfer, I used my fingernail! Lying the foil back on the boot, I rubbed my nail over the stitching with a good amount of pressure and it transferred just how I wanted it to.

Finishing Touch – Sealing

Once I was done transferring the foil over the entire cowgirl boots, it was time to seal them. This has to be done or the foil could rub off, and we don’t want that!

When sealing, you want to make sure you are using a product that will stay flexible and not get stiff. You don’t want your boots to crack.

I have used both Final Coat and Golden Paintworks (Lifestyle Finishes) Top Coat, and they both work wonderfully.

Where to Wear Your Custom Cowgirl Boots?

Anywhere! Anytime!

As my friend from Texas told me, “Your boots are an expression of your personality and they don’t need to match!!”

I love me some country music! So you will be able to catch me wearing these at my next country concert. And Stagecoach is still a few months away, so there’s plenty of time to get a pair ready. You could be a crowd stopper with a pair of your own Foiled Cowgirl boots!

Or maybe you or someone you know is getting married soon and isn’t really the heel type of girl. Imagine what you can do to a pair cowgirl boots for a wedding. My mind is running with so many fun ideas. Silver, White, a bright color, or we could get out the Glitter and rhinestones! The options are endless!


Final Thoughts

Wow! Sometimes you start a project and you’re not exactly sure if your idea will turn out as well as you imagine. This time, it exceeded my expectations!!

I hope this has inspired you to get creative and make your own pair.

If you have any questions please feel free to reach out!

Lastly, if you do end up making a pair, please share! I would love to see what y’all create!

Here is my How-To video for you visual learners!

Artistic & Creative Inspiration

I love teaching, it truly is my passion!  Having the opportunity to be able to teach several times every month makes me so happy and excited.

Sharing my knowledge of techniques, products, and finishes and seeing my students take that information and create with it is my reward.

Okay… Did y’all know that I have this really cool place to hang out and learn my fabulous Signature finishes??? Well… This group is called Artistic & Creative Inspiration Painting Group and it’s about to hit its one year anniversary.

Being a member of this group has a ton of benefits. Each month you learn two new finishes and these finishes can be applied to just about any surface. I’m always trying to make sure I’m mixing it up and sharing finishes that can be applied to many different services: walls vs. furniture.

I come into this group on the 1st and 3rd Monday of every month and teach a new finish to an amazing group. Most of the time, it’s a Facebook Live so that you can watch it live, as well as ask questions during the process. Once in a while, you will have a pre-recorded video if I’m going to be out of town.

Besides learning really cool finishes in this group… I’m always encouraging all members to ask questions, post pictures of projects they are needing advice on, and share their finished projects with the group. We love for everyone to participate in the group, which builds a fabulous supportive community!

I have also shared a few extra bonus videos in the group during the past year and these will be a part of a new section to the group that will be added in November.  Yes!! We are working on adding more resources to our members. We are officially adding a Library to the group!! These will be training videos that will remain in the group and as long as you are a member, you will have access to these additional trainings.

All of this for only $37/Month

SIGN ME UP

**You will be billed every 30 days**

No contract, month-to-month, cancel anytime.

Or $370/Year (2 Months Free)

SIGN ME UP

**You will be billed every year**

Yearly membership is non-refundable.

To keep this community strong and supportive, I have decided to close the group to new members as of October 31st. This means if you want to be a part of this amazing community, you better join soon! So if you have been thinking about it, now is the time! We are not sure when we will be opening it back up for new members again.

Not quite ready to join, but want to learn a new finish?? Grab the instructions to this beautiful finish for free HERE.

For those that have traveled to take classes in the past, this is a fabulous offer! During a 12 month time you will have over 24 new finishes, which is a minimal investment of $370 if you pay annually. That’s just a little over $15 per finish!! This is an amazing steal of a deal and the level of finishes are incredible! Everything from a simple two-step to an advanced multi-layer finish. But… I always keep it simple with my training and explain every step in detail.

Joining this online training group will save you a ton of money! Say goodbye to the travel costs of taking a workshop… Also, you can watch these trainings in your PJs in the comfort of your own home 🙂 Which I like to call a Win-Win!!

November is our Anniversary month and you won’t want to miss out on the amazing new features we will be adding during this month! I will also be doing a Live Furniture painting training during the month of November. I will be teaching you something new and applying it to a piece of furniture. I’m very excited about this live training and transforming a project with all of you.

New things coming to the group:

  • As this group continues to grow and we get to know each other better, I have decided that I will be adding some BIZ Tips for the group.
  • We are adding a Library Recourse to the group: videos, written instructions, and biz tips.
  • Bonus LIVE training, refinishing a piece of furniture (during November)

Here are some of my Signature Finishes:

This past year our members have received over 26 finishes, with another bonus training coming up this month! 🙂

You don’t want to miss being part of this community, so join now before it’s too late.

All of this for only $37/Month

SIGN ME UP

**You will be billed every 30 days**

No contract, month-to-month, cancel anytime.

Or $370/Year (2 Months Free)

SIGN ME UP

**You will be billed every year**

Yearly membership is non-refundable.

PS: Did you snag the FREE formula for this amazing finish below yet?? Grab the instructions HERE.

Rollers & Fabric

If you haven’t figured it out yet, this girl is in LOVE with rollers!! I mean, the applications just seem to be endless… Having so many options, my creative juices start flowing and my head starts spinning!

One of my favorite ways to use my Stamping Rollers lately is to “Stamp” fabric. There are so many different types of fabric to use and so many different DIY projects you can create!  I’m just going to touch on a few ideas to inspire you today, but I’m sure there will be even more blog posts to come in the future on this subject.

Recently I was playing around with some burlap and so many ideas and uses for painted burlap came to mind.

I was playing around on a Facebook Live the other day and I was trying to see if it was easier to: paint the burlap first before rolling a pattern or if it would work painting over the rolled pattern.  Well… GUESS WHAT!! Either way worked just as well… Yay!!

But, isn’t it nice to know that after you rolled a pattern on the fabric and you decided that you wished you had painted a different color for the background that all is not lost and you can paint right over what you have already done!

Okay… Now onto the project 🙂

Just grab your Stamping Roller handle, sponge/foam roller and your favorite roller pattern and let’s get started.

Using a “serving tray” as my paint tray, I cover it with Press-n-seal (that’s so I don’t have to clean it later) and pour out my favorite color of paint. I have to say I love working with my DIY Paints and I used Old 57 and Hey Sailor on this project.

All paints have different consistencies and if the one you have chosen, like the DIY Paints, is a little thicker, then you may want to add a little bit of water to the paint before loading it on the foam roller. Thinner paints seem to soak into the foam much easier.

Insert the foam roller into the small holes that are closest to the handle and roll it into the paint. Make sure that the roller is completely covered with paint. This way it will apply paint to all sections of the pattern roller where needed.

Once the foam roller is loaded with your favorite paint, then you will insert the pattern roller of your choice into the holes on the end of the U-shaped handle. You will now want to get out a piece of practice paper and roll onto the surface.  This will load the paint onto the patterned roller and make sure everything is “rolling” correctly!

From here, I just laid out the Burlap and rolled from one end to the other, skipping about an inch in between my passes.

It takes more time to load the roller than it does to paint your project most of the time.  You can have your fabric project painted so quickly, it’s crazy!

I am thinking that this project will make a nice rustic table runner and who knows what else I will decide to do with the rest of this burlap!

I would love to know what ideas you have going on in your head!  Please share your ideas and uses for Painted Burlap with me!

Check out the Facebook Live I did here:

Products Used:

Stamping Rollers

DIY Paint

Burlap (affiliate link, no extra cost to you 🙂 )


All Funked Out!!

Every once in a while you get to do something for yourself and don’t care what anybody thinks!!!  Well, here is one of those pieces, my funky little end table 🙂

I picked up a pair of these super cute end tables on the side of the road…  Don’t you love it when you find something and it’s FREE?? Yeah?? Me too!!

As usual, they sat around my studio (for many months I might add) until I found a moment to get started.  You know, that dreaded prep time…  I hate sanding, have I said that enough?  LOL!!  I need to find a studio assistant (ASAP!!) to do all this prep work for me!!  But, this piece went out the back door and received a good sanding and cleanup.  Yup, the spider webs and all had to go!! Oh the things you get to deal with during prep.

Now, the fun started and yes I think the primer is fun! Or at least the assurance it gives me to know that my paint will adhere and may prevent any bleed through.  Then… the real FUN began and it was time to break out the DIY Paints!!!  WooHoo… and of course the fun colors 🙂

Talk about a fun palette to use: Old 57, Mermaid Tail, Kissing Booth and Cowgirl Coral … I love getting to play with all these colors.

I started the base with Old 57 and Mermaid Tail – haphazardly applying both at the same time, using a little water to blend the colors.  You can add water to your brush or use a spray bottle and mist.  Once the base was dry, I decided to get a little crazy with my colors and basically dry brush on both the Kissing Booth and Cowgirl Coral.  I really didn’t try to blend these two colors, just more of a random application.

Then on to some pattern and design!  Breaking out my stencils and rollers here 🙂  Don’t you just love adding pattern with stencils? It is such a fun and easy technique to add so much character to a project!

I stencilled the Hampton Medallion pattern randomly and in a distressed look.  Not trying to define all the detail and letting it be faded in the background design.  I stencilled with Americana Acrylics – Sea Breeze and Desert Turquoise (these colors were a close match to the Old 57 and Mermaid Tail).

Once all the stenciling was accomplished, I decided to randomly roll on the Chrysanthemum pattern.  I brushed the paint onto the roller using the Kissing Booth and Cowgirl Coral (at the same time) and just rolled where ever I felt I wanted a little more interest.

This beautiful piece was protected with the Final Coat wipe on varnish.  This stuff is amazing and so easy, just wipe it on with a staining pad.  It dries really fast because you are wiping it on super thin and I just layer about 3 to 4 coats depending on the surface and use!!  Super cool stuff 🙂

Painting is one of my passions and it’s so fun to just let the artist in you out and have fun with a project.  Nothing to match, no one’s opinion, just letting your creativity explode!!

Project Materials:

DIY Paints: Old 57, Mermaid Tail, Kissing Booth, Cowgirl Coral

Chrysanthemum Roller

Hampton Medallion Stencil

Primer  ** affiliate link, no extra cost to you, I will just make a couple dollars **

Americana Acrylic Paints: Sea Breeze, Desert Turquoise  ** affiliate links, no extra cost to you, I will just make a couple dollars **

Final Coat

Getting Funky with some Painted Jeans

So call me a little Funky, a throwback to the 70’s or whatever… BUT I love my painted Jeans!

Talk about fun!!  They are fun to wear and even more fun to paint!!  So grab yourself some jeans and if you don’t have any to paint, head to your favorite Good Will (or your favorite thrift store) store to find a pair at a great price!  This is even a great idea for some practice and playing around.  I picked up several pairs for only $5 to $7 each!!


I love using my rollers to paint on the jeans (I’m currently looking for a denim jacket for another project) and both of the rollers styles can be used.  But for the most consistent application, I like to use the Stamping Rollers.

When using the rollers for painting on fabric there are a few things that you need to know first.  Many different paints can be used, but I have found that fabric paints do work the best.  The main reason is that you are only rolling the paint over the fabric and not working it into the fibers so we need something that is meant for fabric painting.

Even spray a light mist of water over the area you are going to paint – this will help the paint to soak into the fabric.  Make sure to allow the paint to dry for the recommended time and then heat set.  Heat setting can be done several ways: you can bake them in an oven on low, throw them in the dryer for about 30 minutes on high heat or iron using a pressing cloth.  All these methods will work for heat setting the paint.

I have used Plaid Fabric Paint and have also used DIY Paints, General Finishes Milk Paint with adding a Fabric Medium to both of them… BUT the Fabric Paint did wash the best.

So get out your rollers and a pair of those old jeans hanging in your closet and make some wearable art!!

Come on girls, get funky with me!!!

Multi-Medium Canvas Art

I personally have a ton of stretched canvas (new ones still in the plastic). You just never know when you might need one.  And who can pass up a fabulous sale on them, you know what I mean, Hobby Lobby, Michael’s or Aaron Brothers – they just have to tempt us!!!

So, I’m sure like many others I have a pile of unused canvas just laying around and occasionally I find some time to play.  This particular one had been started once before and never finished.  But, I had an inspiration that I thought would look awesome.

The first layer on this canvas was my Texture Medium troweled on thin and then I used the Tiger Roller.  I rolled through the wet material creating three passes.  I allowed the Texture Medium to dry and then sanded down the high points.  At this point, I’m really not sure what the “inspo” was, but it was painted in a Coral color… Hmmm, not sure why and couldn’t remember that particular inspo, so I went with the new inspiration that was rolling through my head!!!

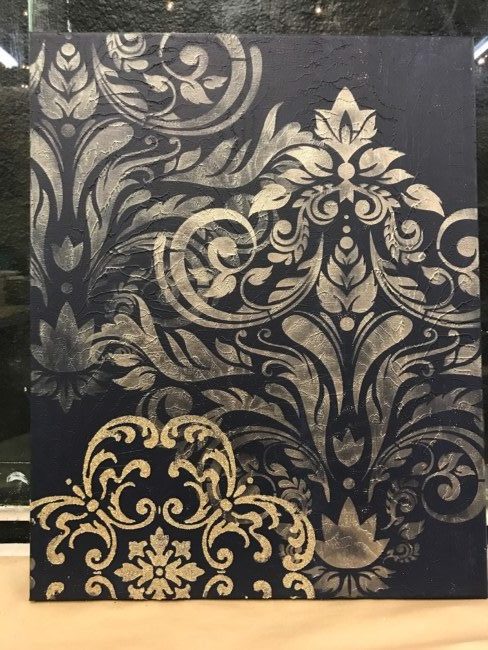
I grabbed some paint and stencils, then decided to share my idea with all my Facebook Peeps and turned on FB Live!  Why not??  I think it’s always more fun painting with friends than by yourself.  With the camera rolling, I shared what I had done and was starting to work on.  The canvas was repainted with General Finishes Milk Paint Coastal Blue (I love this Navy color) and then I used the stunning new stencil La Provence and stenciled it with Modern Masters Metallic Paint Warm Silver and Champagne and created a layered look.  Once the two repeats were completed with the La Provence stencil, it was a hard decision to either stop or add one more element… I couldn’t help myself, so I added another layer.

I had to add the Hampton Medallion stencil embossed with Glass Bead Gel mixed with Glitter. So yummy!!

This beautiful painting has it all, texture, metallic, stencils, glitter and Glass Beads!!!  One beautiful piece of ART!

A canvas can be a place to create fabulous art or even a place to experiment with techniques, products, and styles.

Grab a canvas and get exploring!! Let the Artist in YOU come alive!!

Blessings,

Jenn