Free shipping on orders over $100! **After discounts have been applied & Continental US only

Decorative Painting

Dana’s FIRST Stamping Roller Project

The Before Picture

I love that my customers share pictures of their projects with me and that we get to feature them all on our different social platforms!  And this one I felt deserved to be featured on my blog 🙂

First off, I feel it is very important for you to know that this was her first project with my Stamping Rollers and she rocked it!

Heirloom Pattern Stamping Roller

Here is Dana Killi’s story about this nurses cabinet:

“I finished my first APS Stamping Roller project this weekend!  Earlier this Summer, I spotted a really old, pretty run down nurses cabinet at a yard sale.  Not sure why I stopped because I wasn’t looking for a project, but I felt like it needed saving and a new start.  In addition to needing paint, it had broken/missing molding in several spots, missing knob (so opening the door was tricky) and several chunks and chips out of the wood.  I repaired the molding and made a new decorative accent for the area around the door pull and started painting with the end goal of a driftwood look.  I used Debi’s DIY Paint Weathered Wood & Vintage White and the Heirloom Pattern Stamping Roller.  So fun and surprisingly very relaxing. I may have a new hobby!

Thanks for a great product, your beautiful talent and for sharing it in all of your wonderful videos!

Here are a few Before, during and After photos of the old (and new again) nurses cabinet!!!

Dana Killi”

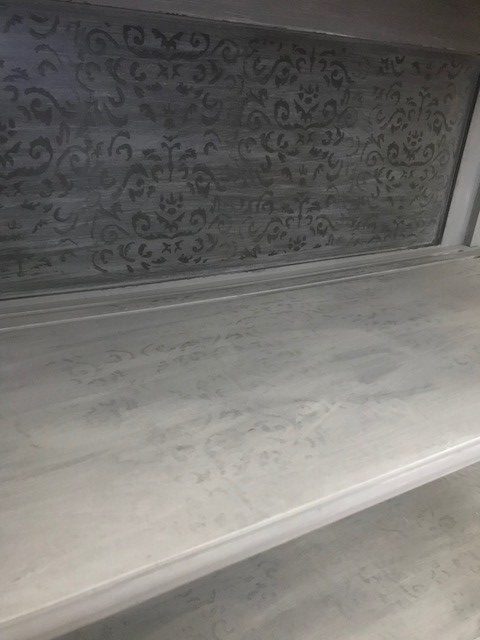
This is the inside of the cabinet before the shelves were installed.
The Finished Transformation Nurses Cabinet

One this last photo, Dana wanted to share a technique that she used to create this look on the shelves.

“After the shelves were painted (in the lighter color), I liked the contrast but decided I wanted to add a little “pretty” to them.  So I used the Heirloom pattern roller on them as well but this time I wiped it back so the finished product had just a light hint of the roller pattern.”

We love Dana’s project and all her creativity she poured into this cabinet!  She did a fabulous job with the Heirloom Stamping Roller and if you would like to see the complete collection of rollers, please check out our website.  Also, make sure to check out our video collection for many application inspirational ideas.

Blessings to all and keep rollin’ 🙂

Links:

DIY Paint

Decorative Art Rollers

YouTube Channel 

Proceed to Lifestyle Finishes – Rebranding

I’ve been a distributor for Proceed for the past six years and I am very proud to distribute their product line!  If you didn’t know, Proceed is actually manufactured by Golden’s Artist Colors. Golden’s Artist Colors makes a fabulous line of materials for artists!

Well… Golden’s Artist Colors has decided it is time to “re-brand” the entire Proceed line.  I completely understand, especially being in business for the last 30 years I have always said that we have to re-invent ourselves every couple of years. We have to stay fresh and on top of our industry especially with the constantly changing trends!

With that being said, Proceed has morphed into Lifestyle Finishes!  Most of the products are the same, but names and labels have changed quite a bit.  We are still getting used to all the new names and I know it can be confusing to you as customers. So… stick around until the end of this blog post and you can snag the Cheat Sheet I created for you (and me LOL).

We love all of the new names and obviously love the fabulous products that we have depended on for many years.  With the “rebranding”, we have been blessed with a few new products as well.  We LOVE the new Venetian Plaster, Metallic Slate, and Protective Sealing Wax.  I always love new materials to play and create with! Makes a creative girl very HAPPY!!

Did you know we ship worldwide and have a full stock of products at all times?? Yup, we try to never run out of anything!!

If you are interested in learning all about these wonderful products, you will definitely want to join me for a full day of learning, creating and understanding the Lifestyle Finishes line.  I will cover each product, what it’s used for and how to use it, you will learn different techniques to apply these products, and you will also learn a couple different finishes to put into practice.

This workshop will be online in a Private Facebook Group.  The training will be Live on October 3rd,  BUT you can watch anytime if you aren’t available on the 3rd.  The videos will be hosted in the Private Facebook Group which will also be a continued learning group for the Lifestyle Finishes Products and Training.  So, no matter if you can make the Live date or not, you can be a part of this training and ongoing educational group.

CLASS DETAILS:

Date: October 3rd

Time: 9 AM – 4 PM (We will have an hour lunch break at noon.)

Cost: $29 per person (Such a fabulous deal to receive this type of training and knowledge!)

Early Bird Special Pricing: $25 per person (Sign up by August 31st and save some money!)

SIGNUP HERE

PS: Grab your Proceed to Lifestyle Finishes conversions “Cheat Sheet” here.


All Things Rust & Patina – Exploring the Possibilities

I have been using the Modern Masters Patina finishes for many many years!  Some of you may remember a few others they used to have like “Baroque”.  YES, I’m as sad as you, I wish they still had that one too!!  But, from what I understand, it had an issue with exploding… LOL!!  Yeah, that is the reason Baroque is gone!!

But my personal LOVE of all things Patina and Rust has been going strong for some time now; maybe close to 20 years 🙂  I have been obsessed with the incredible amount of variations one can achieve using these materials and I always feel like the “mad scientist” when creating with them!!

So, I’m taking a day (well approximately 5 to 6 hours) on August 8th (don’t worry if you can’t be there for the Live taping, you can watch any time it’s convenient for you) and going to share all I know about these materials and how they react, how to get different reactions and even introduce other materials they react with.  Not only will you learn all about the products (so that you become an expert “reactor”) but you will also be learning 3 of my most popular finishes.  YES, 3 of my favorite and amazing finishes will be added to your portfolio and wow all your customers.

Now, this is a fabulous deal!  Stay at home and watch all this good stuff going on, ask questions during the process and have a private room that you will have access to for continued support!!

These finishes are totally “drool” worthy and I’m sure with all your new Rust & Patina knowledge, you will create many new “drool” worthy finishes on your own!

Make sure to sign up soon for this workshop by July 20th to save $30!!  Early Bird Special is $107 after July 20th class fee will be $137……

This workshop will provide all the knowledge you need to become your own “mad scientist” and understand how the products react, the different variations of the reactions and how to control them as much as possible (some of it just happens)!!

Looking forward to sharing my knowledge with all of you so that you can have as much fun as I do with all of these materials by Modern Masters – Metal Effects.

Also, one lucky student will receive a Rust Kit (16oz bottles)  that includes Iron Paint, Rust Activator, Primer and PermaCoat, valued at over $80!!  WooHoo, baby, that’s good stuff!!


Ins & Outs of Debi’s Design Diary DIY Paint

If you know me at all, you know that I LOVE DIY Paint!!

Let me tell you why I love this paint so much and how to use it.

First off, it is all natural and that makes me a happy person considering I’m in it a lot and sometimes, it’s all over me! LOL! Also, this product only has 9 ingredients and has absolutely NO VOCs!!

Second, it’s a little thicker than most paints on the market and holds its form. This is called tooling, meaning it will hold your brush stroke or for me, it holds the roller pattern. I love that I can brush on one generous coat and roll my patterned rollers through the paint and the pattern stays without self-leveling. It’s also thicker than most paints so that I gain a little texture and depth from the roller patterns. This is great for your wax or glazes to set down in and add even more depth to your project!

Third, the colors! I can’t say enough about the color selection!! I’m in love with this palette and they mix so well together to make new colors I want! Yes, I know that I have been a little stuck on the Teal palette, but how can you go wrong with Mermaid Tail, Seaglass and Old 57? They are just fabulous 🙂

So, let’s move on to some techniques you can do with these paints 🙂

Creating a “smooth” finish can be achieved with the following methods:

Option #1 – Wet your brush first with water, but not dripping. This will allow your paint to be a little diluted and thinned out. After several brush strokes, dip you brush into water again and brush back over that area you just painted.

Option #2 – Pour some paint into a separate container and add a small amount of water and mix thoroughly until you have created a thinner consistency. Make sure it is not too watery. The DIY Paint is highly pigmented and this will not affect the color with the little amount of water added.

Use either technique for applying your paint and apply 2 to 3 coats of paint, allowing each coat to dry completely between layers. Also, you will need to sand with a fine sandpaper or a paper bag between coats to smooth out any unwanted texture or brush strokes. You will need to finish with either DIY Wax or Big Top to protect the paint.

Creating a “textured” finish can be achieved with the following methods:

I love how thick DIY Paint is straight out of the can and how easily it can build texture on any surface. Just apply paint directly to the surface from the can, using less if any water at all. Apply your strokes in one direction or in an “X” pattern.

When the first coat of paint has dried completely, you can apply a second coat using the same color or a different color. Paint on the second coat using the same brush strokes, creating even more texture.

For some extreme texture, get out your putty knife and dig into the paint in places before the last coat has dried completely.  This will expose the colors underneath and create a very weathered worn look.  You can also use the putty knife to apply colors randomly by pouring some paint into another container and allowing it to sit out for a while and thicken up!

Again, you will want to finish off with either DIY Wax or Big Top.

The possibilities are endless!!  Let your creative spirit fly and make a masterpiece with these amazing paints!  You can check out the complete line on my website, in my studio or my second location in San Clemente, California, La Casa Verde de Granada!

Be Blessed and Paint!!


Let’s get FOILED

FOILS…

What the heck are they and why is everyone so excited about them?

First, let me try and describe what foils are and how to use them.  Foils are a metallization on the back of plastic and create a bright and shiny surface.  The most brilliant metallics will always be Leafing, but Foils are not far off and much easier to work with or maybe I should say not as messy.

Foils come in soooo many different colors, patterns, and holograms, that you have a ton of options!

The process is also pretty simple. It is simply applying a Foil Adhesive, allowing it to tack up and then transferring your foil.  Okay, I will give you a little more details and step-by-step, but it really is that easy!!

First, you do need a Foil Adhesive for this process and I have a fabulous Foil Adhesive for you.  You need to apply the Foil Adhesive to your surface and allow it to dry to a firm tack.  You can brush or roll this onto your surface, but all your application marks can show through the foil.  Make sure to roll or brush in one direction to minimize your roller marks or brush marks.  Allow the Foil Adhesive to dry for at least an hour before trying to transfer the foil.  The Foil Adhesive that I sell does not dry beyond a firm tack, meaning it is sticky for life.

Once the Foil Adhesive has dried for at least an hour and is a firm tack, you will apply your foil over the surface.  You want to make sure that the shiny bright side is facing you when you apply it.  Use a terry rag or any soft rag and rub the foil into the adhesive surface. Don’t use your hands because they can leave marks.  Always peak underneath the foil and determine how much you want to transfer before removing the foil completely.  There is no standard or correct application, you can transfer as much or as little as you would like to see.  If rubbing with a terry rag is not transferring enough foil for your liking, then get out a scrub brush.  Make sure to scrub the surface up/down, do not scrub in a circular motion.  Again, the scrubber marks may show in your application, so make sure you are scrubbing up and down.  Once you have transferred as much foil as you desire you can remove the plastic.

Due to the fact that the foil adhesive never dries past a firm tack, you will want to apply a top coat not only to seal in the tack but also to protect the foil finish.  Foils are delicate and can scratch easily, so you want to make sure and protect them.  It’s best to make a sample board with a foil transfer and then section off areas to apply different top coat sheens and determine which one you like the best.  Anything in a top coat below Gloss will alter the sheen of the foils.  Sometimes we want to keep them bright and shiny and other times we want to dull the high sheen using a lower sheen top coat, like satin.

Grab yourself some foils and foils adhesive and just play!!  They are easy and fun to work with!!  Just go get creative and create something bright and shiny!!


Transformation of a Great Buy

You know how excited you get when you find the perfect piece for your home?  That’s how my customer felt when she found this piece! It was perfect for her bedroom!

The desk (dresser), chair, and round mirror were what Debbie had been hunting for and she finally found the right size that would fit in her master bedroom.  Now it was time to decide on the palette for the transformation of this project. Debbie and I brainstormed together and came up with the perfect color combo from her bedding and a painting!

Now it was time to figure out the finish that I would accomplish. Since this was a project on Debbie’s list for some time she had collected pictures of different furniture pieces that she liked. With the palette and inspiration photos, it was time for me to get to work.


I brought all the pieces to my studio which gave me the perfect space to work on everything for Debbie. The fun began with sanding and cleaning. NOT my favorite part of any project, but necessary for correct preparation! Once everything was cleaned up, I created the Custom base coat (this was a green/khaki color) and I applied two coats for a good primer base. Once dry, I then created another custom color, matching the Red from Debbie’s painting. I used Debi’s Design Diary DIY Paints Carnival Red and Summer Crush to achieve this custom color (it was about 60% Summer Crush and 40% Carnival Red).IMG_3780

I painted everything Custom Red and applied two coats for an even opaque coverage.  I then went back and made my perfect paint job look old and worn. This was accomplished by using wet cheesecloth to wipe through where I wanted to expose the base color. There are several different techniques for rubbing through depending on the look you want to achieve. I recommend practicing on a sample piece of molding.


The distressing takes a little time when you want it to look authentic. Once I accomplished all the distressing, I glazed with Modern Masters Glaze tinted with an Umber colorant to deepen the colors. Then I applied Clear and Dark wax to enhance the aging process.

I totally LOVE working with the DIY Paints paints!  Many different looks can be accomplished with very little effort.