Are you looking to add some personality to your cowgirl boots?
Do you have an old pair of country boots that are hidden away in the back of your closet?
If you are tired of your boring brown boots, like the pair below, then get ready to see how easy it is to make them look amazing!

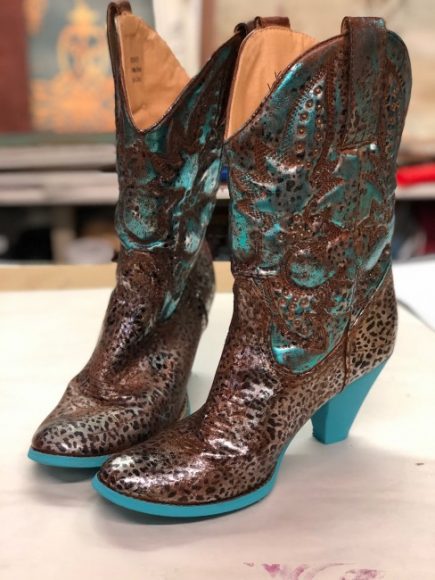
Whether it’s an old pair that you don’t wear anymore or you are looking to stand out, it’s time to transform your country boots into a pair of beautiful boots like these..
Are you curious how I was able to make my boring cowgirl boots look so fabulous?
You can do it too! It’s really not as hard as you may think.
All it takes is a creative imagination, Metallic Foils, and some Foil Adhesive to create your own cute cowgirl boots.
Before Starting
Before we jump into how exactly we make these gorgeous cowgirl boots happen, you need to have a vision of what you want to create.
Start by exploring all the different Metallic Foil options we have at Artistic Painting Studio here. We have a variety of decorative foils that come in different color variations and patterns to inspire and highlight your unique creativity.
While exploring your creative side, start envisioning what you want your country boots to like when they are all done. You can use your favorite color or combine multiple as I did on this pair!
Metallic Foils: What Are They?
Now you may be wondering what exactly are Metallic Foils?
They’re like the foil in your kitchen! Just kidding, these decorative foils are very, very different.
Metallic Foils are a metallization on the back of cellophane. This metallization on the cellophane is the color or pattern that will be transferred to your project!
To get the metallization to transfer onto a surface, the surface must be extremely sticky. After getting fed up with the ‘foil glues’ out there, I created my own called, Foil Adhesive. This foil adhesive dries stickier than anything else out there and allows the deco foils to transfer easily.
*Tip – Once the metallization has been pulled off of the cellophane, make sure the cellophane does not touch any areas that are still sticky because it will get stuck!
Cowgirl Boots Makeover – Let’s Get Started!
Prepping The Boots
Are your boots real leather? If yes, then you can skip this first prep step. Yay!
For those of you like me, with fake leather boots, our first step is to seal the surface of our cowboy boots. All you need to do is paint on a layer of Top Coat to the surface. Allow this to dry, roughly about an hour, and then you can get started.
Now we are all on the same step – Applying Foil Adhesive!
With your favorite brush, paint on a layer of the Foil Adhesive where you want the Metallic Foils to transfer. I choose to put foils on my entire boot, so I brushed the adhesive on the entire boot.
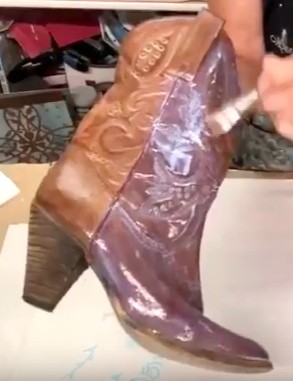
But, if you are looking to only add foils to part of your boots, just brush on the Foil Adhesive where you want to apply your foils. You can always come back and foil the other areas later.
After you have applied adhesive, you need to wait a minimum of 30 to 60 minutes to allow it to set-up to a firm tack. It will never dry beyond a firm tack; so don’t worry if you wait even longer before getting to the next step.
Testing Your Vision
As you wait and allow the Foil Adhesive to dry, test out what you have been envisioning prior to adding it to your boots. I always to do this first!
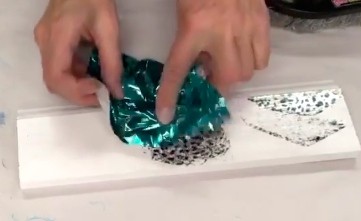
I will usually use a scrap piece of wood for testing, but you can really do it on anything you have lying around. Just add a layer of Foil Adhesive to it prior to brushing it on the boots so it has time to tack up.
Different Techniques for Transferring Foils
As with most things, there is more than one way to transfer Metallic Foils. The two techniques I use are Flat Lying and Crinkle.
With both of these techniques, always make sure the color/pattern side is facing up because the metallization is on the back!
With Flat Lying you want to cut off a piece of foil and keep it smooth. Lay it on the surface and transfer the metallization by rubbing the foil with a terry rag or scrub brush. You can pull the foil up a bit and peak to see how well it transferred. If it hasn’t transferred enough foil, simply lay it back down and rub it with a little more force.
You can also take your piece of foil and crinkle it up. Once crinkled, you will want to dab it around the area you want it to transfer to. When using this technique I prefer to use solid color foils rather than pattern because the pattern will be lost without the even pull from the adhesive.
Combining Colors and Designs
If you are looking to create truly unique boots, don’t be afraid to layer on different foils.
Whether it’s adding a color to a design you like or blending two colors, let your creativity take over.
Now play around on your sample board with the different techniques and a few different foils until you create exactly what you want!
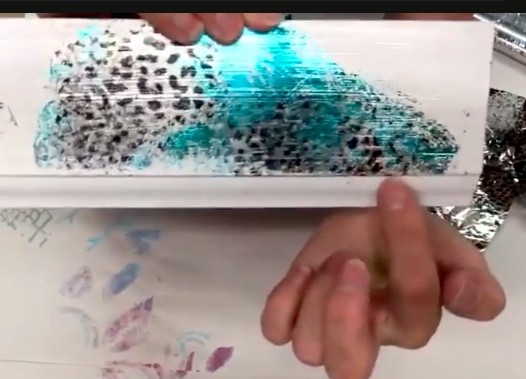
Transferring Metallic Foils onto the Cowgirl Boots
After testing my designs, I decided I wanted to use Silver Leopard and Seafoam. The bottom section would only have the Leopard foil, while the top would combine the two.
Turquoise Cowgirl Boots
Whether you start on the bottom or top section is up to you! I started off by adding the Seafoam to the top section. Because I knew I was going to come back over with Leopard, my goal was not to create a 100% transfer with the Seafoam.
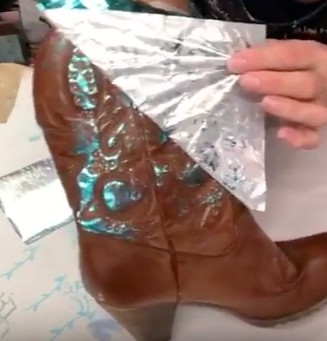
Using the Flat Lying technique and my scrub brushed, I rubbed the foil onto the boot. I started off with a lighter pressure when rubbing because of not wanting the full transfer. After a little rubbing, I lifted a corner to see how much of the turquoise had transferred.
I thought it needed a little more. So I simply laid it back down and added a little pressure to my scrubbing. Remember you can always transfer more, don’t go overboard to start!
Silver Leopard Transfer
Once I had the right amount of Seafoam covering the boot, it was time to add the Silver Leopard foil. With the bottom section still being extremely sticky and not wanting any foil to accidentally get stuck to it, I started there.
With the lower section having some weird angles to it, I went ahead and cut my Metallic Foil into smaller pieces. This does two things, it allows me to get the pieces to lay flat and also allows me to get the most out of each piece!
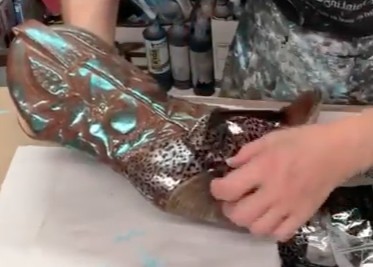
Piece by piece I added the Leopard around the boot going for a full transfer this time. After it was all covered, it was time to move to the top again.
Since the turquoise had been transferred to a lot of the high points on the boot and not really any of the stitching areas, my goal was to get the Leopard to transfer there. With all those nooks and crannies, this turned out to take a little more effort.
Rather than being able to rub the brush on the foil to get it to transfer, I used my fingernail! Lying the foil back on the boot, I rubbed my nail over the stitching with a good amount of pressure and it transferred just how I wanted it to.
Finishing Touch – Sealing
Once I was done transferring the foil over the entire cowgirl boots, it was time to seal them. This has to be done or the foil could rub off, and we don’t want that!
When sealing, you want to make sure you are using a product that will stay flexible and not get stiff. You don’t want your boots to crack.
I have used both Final Coat and Golden Paintworks (Lifestyle Finishes) Top Coat, and they both work wonderfully.
Where to Wear Your Custom Cowgirl Boots?
Anywhere! Anytime!
As my friend from Texas told me, “Your boots are an expression of your personality and they don’t need to match!!”
I love me some country music! So you will be able to catch me wearing these at my next country concert. And Stagecoach is still a few months away, so there’s plenty of time to get a pair ready. You could be a crowd stopper with a pair of your own Foiled Cowgirl boots!
Or maybe you or someone you know is getting married soon and isn’t really the heel type of girl. Imagine what you can do to a pair cowgirl boots for a wedding. My mind is running with so many fun ideas. Silver, White, a bright color, or we could get out the Glitter and rhinestones! The options are endless!
Final Thoughts
Wow! Sometimes you start a project and you’re not exactly sure if your idea will turn out as well as you imagine. This time, it exceeded my expectations!!
I hope this has inspired you to get creative and make your own pair.
If you have any questions please feel free to reach out!
Lastly, if you do end up making a pair, please share! I would love to see what y’all create!


